cube 文件生成小工具
type
status
date
slug
summary
tags
category
icon
password
Property
May 1, 2023 07:49 AM
URL
运行环境:Debian : 11.6
运行载体:Jupyter Lab,Gaussian09 自带的 cubegen 软件
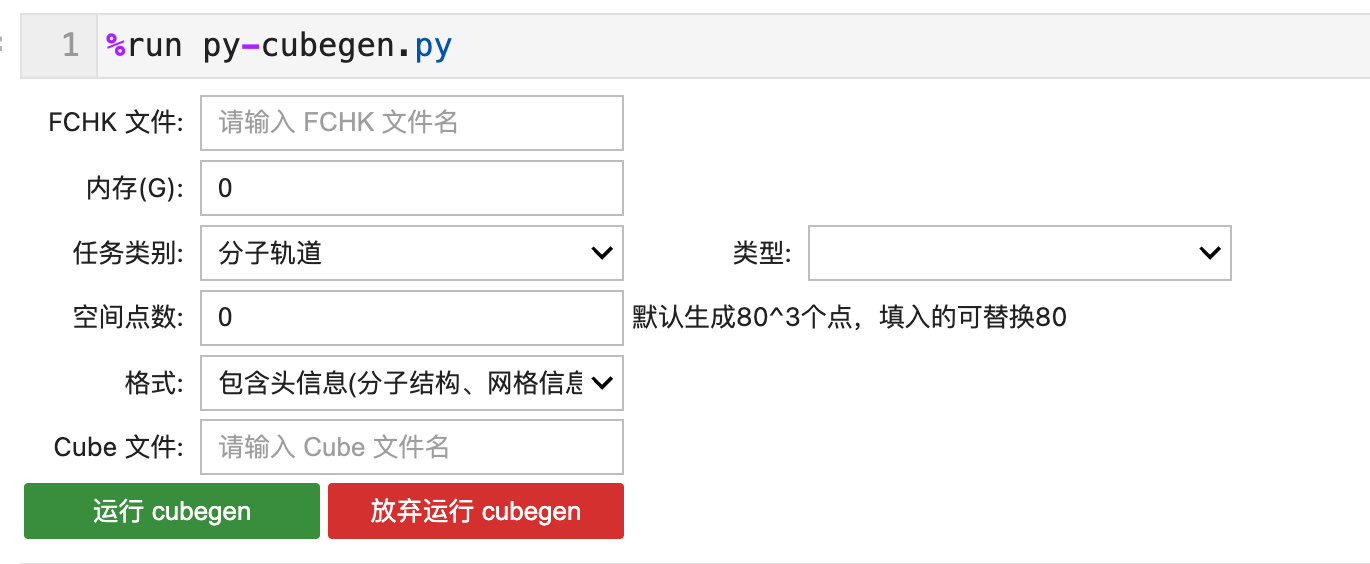
预览图

功能:
- 全中文
- cube文件名根据你的输入来自动生成
1. 准备工作
- 下载 python
- 安装 Jupyter Lab
上面的都是网上一大推,这里就不说了
- 安装所需要的 python 依赖包
pip installi pywidgets
请注意,这个包需要 Jupyter Notebook 4.2 或更高版本。如果你使用的是旧版本的 Jupyter Notebook,你需要更新到最新版本才能使用 ipywidgets。
2. 运行代码
2.1 懒人做法
使用我的 CDN 脚本,下面是 Ubuntu/Debian 下的操作,其他的懒得搞了
sudo apt install curl -y && \ curl http://pic.wxyh.top/scripts/py-cubegen.py -o py-cubegen.py && \ sed -i.bak 's#/home/wxyhgk/g09/g09/cubegen#'"$(which cubegen)"'#g' py-cubegen.py
说明
首先,它会安装
curl
工具,用于从指定 URL 中下载文件。接着,它会使用
curl
工具从指定的 URL 下载一个名为 py-cubegen.py
的 Python 脚本,并将其保存在当前目录下。最后,它会使用
sed
命令在下载的 py-cubegen.py
脚本中替换一个路径。-i.bak
选项会在替换操作之前将原始文件备份,并将备份文件的扩展名设置为 .bak
。替换操作完成后,应该会生成一个新的 py-cubegen.py
文件,该文件中的特定路径已被替换为用户系统中安装的 cubegen
软件的路径。最终,生成的脚本可以在 Jupyter Lab 中使用
%run py-cubegen.py
命令运行。2.2 手动做法
2.2 手动操作
将下面的代码保存为
py-cubegen.py
文件py-cubegen.py 代码
# === 1. 导入所需的库 === import os import subprocess import ipywidgets as widgets from IPython.display import display # === 2. 定义一个函数,根据任务类别更新类型选项 === def update_kind_options(*args): options = { '分子轨道': [ 'Homo', 'Lumo', 'All', 'OccA', 'OccB', 'Valence', 'Virtuals', 'AMO', 'BMO' ], '电子密度': [ 'SCF', 'MP2', 'CI', 'QCI' ], '静电势': [ 'SCF', 'MP2', 'CI', 'QCI' ], 'alpha自旋密度': [ 'SCF', 'MP2', 'CI', 'QCI' ], 'beta自旋密度': [ 'SCF', 'MP2', 'CI', 'QCI' ], '梯度': [ 'Gradient' ], '拉普拉斯量': [ 'Laplacian' ], '密度梯度模': [ 'NormGradient' ] } kind.options = options[args[0]['new']] # === 3. 定义一个函数,根据所选选项构建并运行cubegen命令 === def cubegen_command(memory, category, kind, fchkfile, cubefile, npts, fmt): category_dict = { '分子轨道': 'MO', '电子密度': 'Density', '静电势': 'Potential', 'alpha自旋密度': 'AlphaDensity', 'beta自旋密度': 'BetaDensity', '梯度': 'Gradient', '拉普拉斯量': 'Laplacian', '密度梯度模': 'NormGradient' } command_category = category_dict[category.value] command_kind = f"{command_category}={kind.value}" command = f"/home/wxyhgk/g09/g09/cubegen {memory} {command_kind} {fchkfile} {cubefile} {npts} {fmt}" print("运行以下命令:") print(command) subprocess.run(command, shell=True, check=True) # === 4. 定义输入小部件 === category = widgets.Dropdown(options=['分子轨道', '电子密度', '静电势', 'alpha自旋密度', 'beta自旋密度', '梯度', '拉普拉斯量', '密度梯度模'], description='任务类别:') kind = widgets.Dropdown(description='类型:') category.observe(update_kind_options, names='value') # 更新类型选项以匹配初始任务类别 update_kind_options({'new': category.value}) # === 5. 细化小部件 === # 5.1 fchkfile 部分 fchkfile = widgets.Text(value='', description='FCHK 文件:', placeholder='请输入 FCHK 文件名') # 5.2 memory 部分 memory = widgets.BoundedIntText(value=0, min=0, description='内存(G):', placeholder='运行命令使用多少G,默认是0,不懂就别改') # 5.3 npst 部分 npts_label = widgets.Label('默认生成80^3个点,填入的可替换80') npts = widgets.BoundedIntText(value=0, min=0, description='空间点数:', placeholder='立方体每个边的点数,默认是80^3') npts_box = widgets.HBox([npts, npts_label]) # 5.4 fmt 部分 fmt = widgets.Dropdown(options=[('包含头信息(分子结构、网格信息等)', 'h'), ('不包含头信息', 'n')], value='h', description='格式:') cubefile = widgets.Text(value='', description='Cube 文件:', placeholder='请输入 Cube 文件名') # 5.5 运行按钮 部分 run_button = widgets.Button(description='运行 cubegen', button_style='success') run_button.on_click(lambda x: cubegen_command(memory.value, category, kind, fchkfile.value, cubefile.value, npts.value, fmt.value)) # ”放弃 cugengen 命令“的按钮 cancel_button = widgets.Button(description='放弃运行 cubegen', button_style='danger') # 将 ”运行 cugengen 命令“ 和 ”放弃 cugengen 命令“的按钮 放在同一行 buttons = widgets.HBox([run_button, cancel_button]) # 5.6 kind 和 选项放在一起 category_kind = widgets.HBox([category, kind]) # === 6. 根据用户选项更新 cube 文件名函数 === def update_cubefile_name(*args): cubefile.value = f"{os.path.splitext(fchkfile.value)[0]}_{category.value}_{kind.value}.cube" # === 7. 为 FCHK 文件名、任务类别和类型添加监控 === fchkfile.observe(update_cubefile_name, names='value') category.observe(update_cubefile_name, names='value') kind.observe(update_cubefile_name, names='value') # === 8. 组件纵向排列 === input_widgets = widgets.VBox([ fchkfile, memory, category_kind, npts_box, fmt, cubefile, buttons ]) # === 9.展示 === display(input_widgets)
找到第 57 行中的
/home/wxyhgk/g09/g09/cubegen
关键字,
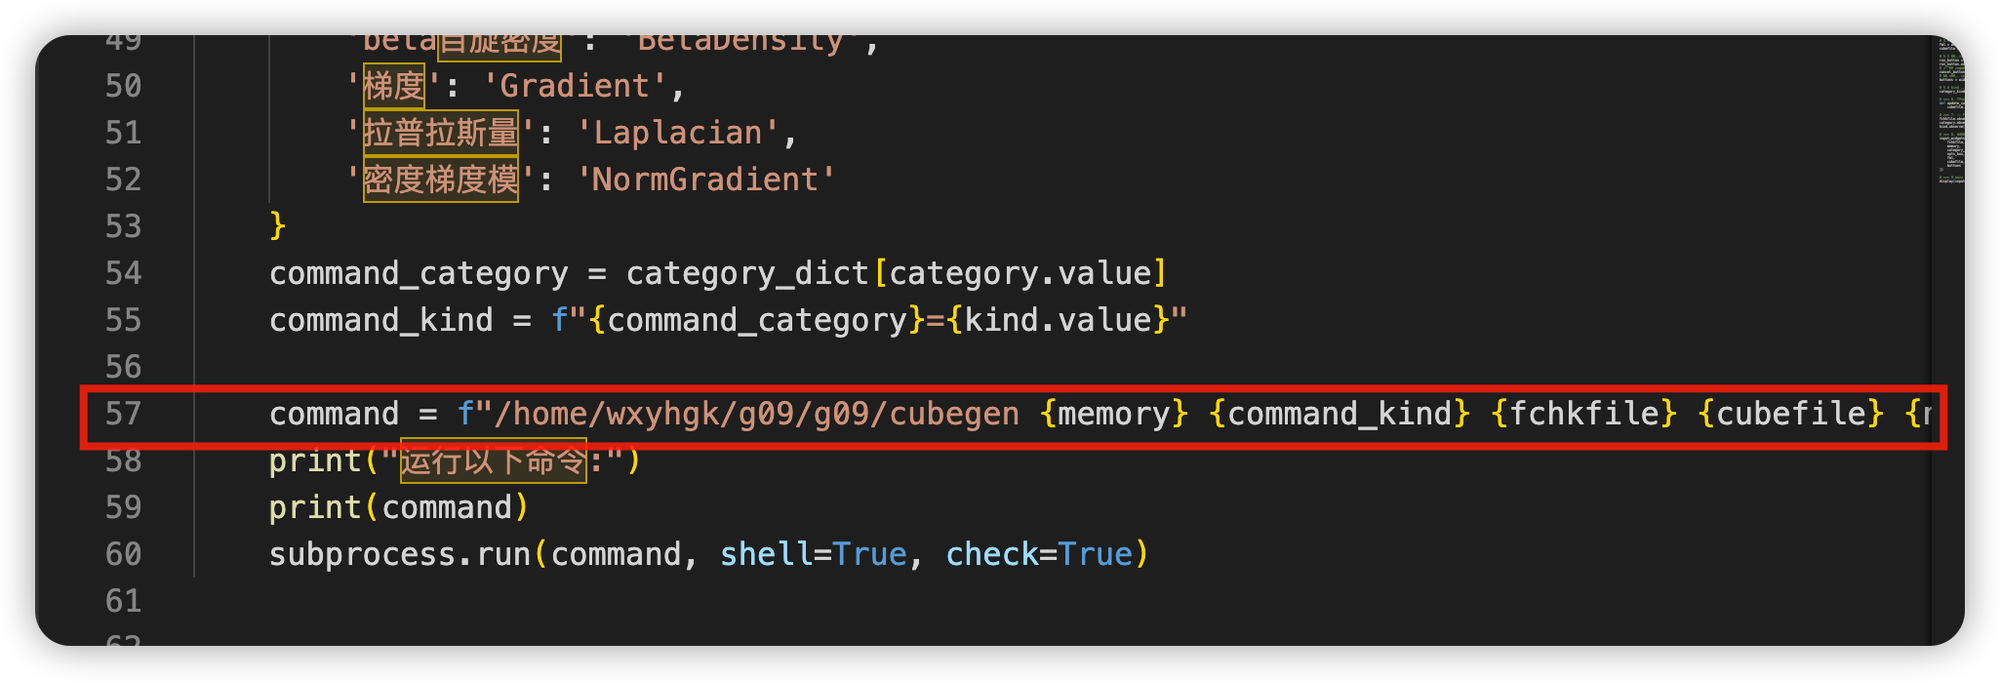
替换成你的 cubegen 文件的路径
在
linux
中可以使用 which cubengen

3. 使用
然后在 Jupyter Lab 里面使用
%run py-cubegen.py

正在酝酿的工具